Sunday, August 30, 2009

Some new deals and presents from Mom!

Here's the bathroom accessorized. Mom brought me the letters spelling "RELAX". The picture above the toilet was $5 at OTP. The new teal towels are also from OTP - wash cloths $1.29, hand towels $3.99, white bath towels $4.99. I used the silver tin bowl from the thrift store and filled it with extra towels. The picture frame above the towel rack was $.50 at the thrift store. I spray painted it white and used the gray ribbon from the pillow I made in the guest bedroom. I tied a bow and hung it on the wall with just a nail. I would love to do this with old door knobs, but I have to find them first.
Mom gave me this octagon mirror. The frame was oak, but I spray painted it white and just have it leaning against the wall. I should hang it, but just didn't have time. Mom also brought me the crystal lamp. It's very different, but I'm going to spray paint the bottom silver since I'm not a gold fan. It gives off the prettiest light. I got the oval frame for $2 at OTP - that's how Kolin refers to Old Time Pottery.
Here are the pictures hung.
This is a picture of another set of letters mom brought me "DREAM". I have it on the ledge in the front window.

Monkey Bread with the family... how fitting

This weekend my mom visited for the first time at our new house... a great excuse to cook all weekend. I didn't get the camera out for all the food, but I remembered to take a picture of the monkey bread this morning.
One of my favorite breakfast recipes is Monkey Bread. It makes a bunch so I only make it when we have guests over.
Monkey Bread:
  • 4 cans of small biscuits cut in 4 pieces each
  • 2/3 cup sugar
  • 1 tsp. cinnamon

Mix together so all pieces of biscuit are covered with the mixture. Spoon the pieces into a greased fluted pan. I love my stoneware fluted pan ($29)

  • 1 stick butter
  • 1 cup brown sugar
  • 1 tsp cinnamon

In a sauce pan over the stove combine the ingredients above and bring to a boil. Pour the mixture over the biscuits in the pan. (Add pecans to the top - you can add them whole or chopped)

Bake in the oven 40-50 minutes.

Here's the empty pan... Kolin loved doing dishes all weekend.

Here's a list of the other meals we had:

  • Thursday Dinner - 30 minute chicken in pampered chef deep covered baker, risotto, broccoli, salad and french baguette. Brownies too!
  • Friday Lunch - Lemon Chicken Risotto soup (made with the leftovers)
  • Friday Dinner - Homemade Pizza with garlic and herb crust. 1- Sausage and Pepperoni and 2- Sausage, Chicken and Spinach
  • Saturday Breakfast - Cinnamon Banana Pancakes, Bacon and Fruit
  • Saturday Dessert - Homemade M&M cookie and ice cream sandwiches
  • Sunday Breakfast - Monkey Bread
  • Sunday Lunch - Cookout with brats, pork chops, corn on the cob, mac 'n cheese and salad

I think everyone had a great weekend... and a few extra pounds :)

Tuesday, August 25, 2009

Mini Muffin Brownies... with peanut butter filling!

You will soon learn that I have a weakness for chocolate and chocolate and peanut butter... and chocolate and caramel... and well you get the point. I was trying to think of more ways to use my Pampered Chef mini muffin tin ($16) because bite size snacks and desserts are always a hit. Well I was watching some cooking show and they made brownies in real cupcake tins... Oh I can do that in a mini! Of course I have to use my small scoop (12.50) to curtail the mess of getting them into the tin.
Moving on... I was craving more than just a brownie. I remembered that all my girlfriends had me make peanut butter frosting for brownies the last time we were together. Light Bulb: make a peanut butter filling to put inside. So this is what I did:
Brownies:
  • Make the brownie mix just as it says on the box
  • Spray the mini muffin tin
  • Use a the small scoop for the brownie batter

Peanut Butter Filling (I just eyeball):

  • 1/4 to 1/2 cup peanut butter
  • 1 cup of powdered sugar
  • pinch of salt
  • pinch of vanilla
  • 3 Tbsp of milk (more or less depending on the consistency)

So you just take the filling, put it in a ziplock bag and cut the tip. Just pipe it into the middle of the brownie.

Bake at 350 degrees for about 9-10 minutes. Let them sit on the counter to cool a few minutes before trying to get them out. They are just perfect because they are a little chewy around the edges, but perfect in the middle with the peanut butter.

I hope you like these as much as I do!

Guest Bathroom... Remodel

Here’s the before of this outdated blue and plastic (the vanity was plastic) bathroom… don't you love the ballerina border and the striped wallpaper. I actually thought about doing subtle stripes on the finished walls to keep at least one element from the room the same. I'm still debating... always something I can add later.
Do you see that the blue tub and surround match the toilet and the swirled seashell sink. One of a kind. It's especially cute to have a room where there are both ballerinas and safari animals.
Here it is ripped apart… but still blue and the inside of the mirror was OLIVE!!! Here it is today… More pictures to follow once I start putting the finishing touches on it. I can't wait for my towel holders, shower curtain and pictures to be hung. I also calculated the remodeling cost. This bathroom was done with NEW EVERYTHING (but the tub) for about $750. The refinishing of the tub ($550) is what put us at about $1,250 for the entire room. I still think that's a deal. Here's a breakdown of what we did:
  • New Vinyl flooring - I installed it with a grout line ($40)
  • New Trim
  • New Vanity ($199) and Sink ($130) and Faucet ($55)
  • Refinished Tub ($550)
  • Toilet
  • Mirror ($20) - got it on the clearance aisle at Home Depot
  • Paint - already had it from the old house bathroom - FREE
  • Light Fixture and bulbs
  • Hardware for the door, towel rods and toilet paper holder
  • Shower Curtain rod, rings and curtain
  • Reusing some towels from other bathrooms
  • I'm going to use the silver bowl I found at the thrift store for the back of the toilet I think!

Much more to come. I can't wait to post pictures of the room with clothes on. I thought you would all still appreciate the new clean look of the bathroom with the dirty work done. Thank you everyone who pitched in and helped or had ideas!

Wednesday, August 19, 2009

Pot Pie Dinner and Power Outage

I had a craving for a homemade (semi-homemade) pot pie. A friend of mine used to make them for me, but now she lives in Iowa and I don't think they'll mail well. I had to do some research earlier this week to figure it out on my own. I was able to make one tonight before the power went out. I think it turned out pretty well (I combined a bunch of different recipes).
This is what I did:
1. Store bought pie crust (who has time for homemade on a weeknight?) Baked the bottom crust for 10 minutes before filling.

2. Cooked 2 chicken breasts in 1/2 onion and clove of garlic and used the "mix 'n chop" from pampered chef. If you don't have one you need to order one :)

3. Melted a half stick of butter and whisked in 1/2 cup of flour with salt and pepper. It turned into a thick paste. To thin it out I used a cup of fat free half and half. Then I added a can of reduced fat cream of chicken.

4. I steamed broccoli (I don't really like peas) and carrots in my "Large Steamer" also a favorite of mine. I put chicken seasoning over them when they steamed for more flavor.

5. I combined the chicken/ gravy mixture and veggies (I also added some left over risotto) and poured it into the crust. Topped it with the remaining crust and baked it for 20 minutes.

Like I said, the power went out, but only after I enjoyed my semi-homemade pot pie!

I inherited my creativity

You have to see the photo my grandma sent me today. This is of the wall right over her washer and dryer. I thought it was a decal she found and applied to the wall. I asked her about it and this was her response, “I painted it, I looked at the big picture I have on my dining room wall. It was a little difficult because I had to sit on the washer or kneel.” I think she did a great job – kudos Aggie! (I don’t call her grandma ‘cause she’s just too young still). My mom has some ideas of her own. We were talking on the phone last night and she was telling me about all the great finds at a recent garage sale. A new bedroom set and a crystal lamp for the guest bedroom. She’s coming in just a few weeks, so I’m doing my best to get the bathroom upstairs ready for guests.

Saturday, August 15, 2009

A 50% off sale at the Thrift Store!

The Saturday morning tradition continued after breakfast "Blueberry Coffee Loaf". Kolin stayed at home to install doors, but I couldn't resist. I was just going to run to the hardware store, but the 50% off sign was calling me. Here's what I found... I got the following for 50% off:
  • Caned Chair - $5
  • Set of Pictures - $2.50 (I just wanted them for their frames)
  • Silver/ Tin bowl - $1.50
  • Wooden Pedestal - $1.50
  • Brass/ Wood Candle Holders - .50

I've already spray painted the pedestal black, the candle holders silver and the picture frames a white wash. I'm not really sure what I'm going to do with the chair yet, but i have seen some really cute ideas on other blogs lately. Stay tuned to see some of this stuff in future pictures.

Total cost of my visit- $11 and many hours of fun!

$9 Fireplace Mantel

As you will can see my fireplace needs some help... I like to say it has a railroad tie bolted on the front.

It will eventually get it's much needed makeover, but here's what I came up with to get by... Mirror ($2) and group of picture frames different sizes and colors ($5)-- all from the Thrift Store. Spray Paint ($2) and "Live, Laugh, Love" I already had.

I'd love to hear your ideas for it's formal makeover. I can't wait for Christmas - Santa will finally have a chimney after all these years!

Blueberry Coffee Loaf

Blueberry Coffee Loaf Recipe:

  • 1/2 c. sugar
  • 1/4 c. oil
  • 1 egg white
  • 1 tsp. baking powder
  • 1/2 c. milk
  • 1 c. flour
  • 1/2 tsp. salt
  • 1 c. blueberries (If frozen, don't thaw)

Combine all ingredients together except topping, folding blueberries in last. Pour into well greased Pampered Chef Stone Loaf Pan.

TOPPING:

  • 1/4 c. sugar
  • 3 Tbsps flour
  • 1 tsp. cinnamon
  • 3 Tbsps oil

Mix topping together and sprinkle over top. Bake at 375 degrees for 30 minutes or until golden brown.

Friday, August 14, 2009

I'm a Pampered Chef!

I had my first Pampered Chef party about 2 years ago. It was a blast and I got a bunch of free and discounted products for just having a party. It was a great night with family and friends. My party was a chocolate theme – Double Chocolate Nutty Brownies and Chocolate Fondue. I remember thinking that night how much fun it would be to host the cooking shows and help others upgrade their kitchen products and share great recipes.

Now 2 years later with school finished and a larger kitchen, I signed up! I’m now a Pampered Chef Consultant. I had my first open house party July 29th. I made all the food ahead of time so everyone could converse and see the new house. We had the following:

  • Salsa Bites
  • Pecan Tassies
  • Chocolate Peanut Butter Swirl Cake
  • Fresh Salsa
  • Fruit Salad in the Trifle Dish

I had about 16 guests and everyone found something they had to have. I took orders outside the party as well. The show sales were over $1,000!! Because July's host special was additional $$ I was able to get $315 in free products, (4) 50% off items and the Stainless Steel Bowls for 60% off. I ended up getting over $500.00 worth of product for about $100.00 – I love a deal!

My start-up kit for Pampered Chef was $155 and I got over $500 of products and party supplies.

If you want to see all of their products visit http://www.pamperedchef.com/. These are some of my favorite items:

  • Deep Covered Baker # 1352 - 30 minute chicken (MICROWAVE) - no need to heat the oven for this recipe
  • Large Micro Cooker # 2778 - Steams vegetables in 3-4 minutes (MICROWAVE)
  • Stoneware Fluted Pan # 1440 - Makes the best cakes even peanut butter chocolate cake recipe (Oven or MICROWAVE)

Are you noticing a trend that I like to use the microwave in the summer? There's also a great Grilling Basket # 2707 for grilling veggies outside. The fall items are coming out soon as well.

I’m sure I’ll feature some items and recipes in the future. Let me know if you would like to host a cooking or catalog show soon!

Summer's almost over...

It hit me this morning that summer is coming to an end… Kolin had to get up for work this morning (he’s a teacher). The summer recipe I’m about to share has now become one of my favorites. I’m not typically a lemon dessert person, but this is a refreshing and sweet treat on a hot summer day.

Lemonade Cake

Cake Mix: 1 white cake mix as directed on the box - add juice of 1/2 lemon and lemon zest - Bake as directed - Cool to room temperature.

Lemonade Glaze:

  • 6 oz. Lemonade Concentrate (thawed)
  • 3/4 cup powdered sugar
  • Yellow food color as desired

Mix together until smooth, poke holes in the cake and pour glaze over the top. Top with icing or whip cream and a slice of Lemon! YUM!!!

**I have to try this with Pink Lemonade too!

Laundry Room

The before picture of the laundry...
Oh I’ve always dreamed of having a large laundry room… now I have one. Let me tell you the project is just in the beginning stages. I’d love to do much more with it, but it’s a work in progress – like everything else.
I was able to get 2 different colors of blue paint and mixed them together for this custom color – FREE paint! I still need to paint out the window white and decide on some curtains. I’m thinking white curtains with blue accents (Ribbons, buttons, fabric paint… ) We hung the rack last week so I can finally hang clothes in the Laundry room… now I need more hangers! I want to paint something on the wall – I think I’ll need to do it in white or maybe a darker blue?
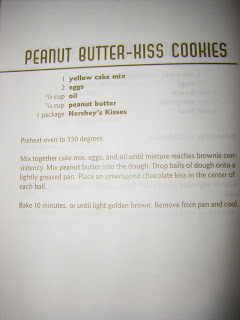
I’m debating on some of the sayings:
  • It will all come out in the wash
  • Laundry Room – Drop your drawers
  • Laundry Room – Sorting it out one load at a time
  • Soak, Wash, Rinse, Dry, Fluff, Iron, Fold (All over the walls in different places in different fonts?)
I’d love a new white cabinet and farm house sink with shelves and cabinets above a new set of front load washer/ dryer set. A girl can dream, can’t she??
This was my quick project this Sunday afternoon. I had to make a couple new curtains for Kolin's classroom so I picked up some extra $2/ yard white seersucker fabric and ribbon for my Laundry room curtain. The best part was I never got my sewing machine out... I'm loving iron on tape!

Monday, August 10, 2009

Quick Quiche

Tonight we tried something new - quiche. I like quiche when I'm out, but I've never really made it at home. I just got a set of new tart pans from my Pampered Chef party, but of course I don't have any pie crust on hand (I'm not attempting that at dinner time either) so I decided to google a quick quiche with bisquick thinking that would be the crust. The recipe that I found had everything mixed together, so it's really not a real quiche. I will try to make a real quiche when I have more time. I used broccoli, onion and mushroom for the filling and Monterrey jack cheese for the shredded cheese. It was pretty good - Kolin like it more before he found the mushroom. I thought I chopped them up enough in my chopper, but he found one! He still had 2 slices. Recipe: 1-2 c. fillings of your choice (example broccoli, mushrooms, etc.) 1 c. shredded cheese 1/4 c. chopped onion 2 c. milk 1 c. Bisquick 4 eggs 1/4 tsp. salt 1/8 tsp. pepper 1. Heat oven to 400 degrees. 2. Grease 10" pie plate or 8" square. 3. Sprinkle fillings, onions and cheese in plate. 4. Beat remaining ingredients until smooth and pour into plate. 5. Bake 35 to 40 minutes or until a knife inserted halfway between edge and center comes out clean. 6. Let stand 5 minutes before serving. **I sauteed the broccoli, mushroom and onion in a skillet with butter before I put it in the pie pan. I wanted to make sure the onions were cooked.

Guest Bedroom Update

The guest bedroom (gray bedroom we like to call it) continues to change. We had a white dresser (paint was coming off in places) with gold handles. Instead of repainting it I decided to just distress it and spray paint the handles in silver. What do you think? I need to figure out what to put on it.
Also, The bedding for this bed is a little of this and a little of that. The comforter was one I found before we got married. The bed skirt and white shams came with our down comforter, I found the Euro Shams this weekend. The quilt was from my mom and the pillow I made.
Speaking of Euro Shams - I was so scared of getting them because one - they are pricey and two I don't want to try and find euro pillows. Well after some digging at the mall I found some at Dillards for $10/ each sham. I think that's a pretty good price compared to some that were $40-$60/ EACH!! Then my next mission was to find the pillows. My MIL suggested just putting 2 standard pillows together. What a great idea. I had just seen pillows at Target for $2/ piece. So my euro shams and filling was just $28.
My mom gave me these pictures out of her house. I think they are going to go great in this room! Now I just have to wait for my antique door headboard to be constructed.

Inspirational Sayings

One of the ways I customized our old how was by finding a saying/ verse that I really liked... then put it on the wall. Now I know there are many companies and sites that offer vinyl lettering, but I'm impatient and can't wait for the mail. When I have something I want to do, I want to do it instantly.
I just paint it on with a paint pen. These pens are easy to find at the hardware or craft store. They also come in lots of colors. I've only used black and gold... so far :)

You must be thinking that I've got amazing handwriting, but wait I don't. Therefore, I turn to my husband's profession - TEACHING. Most of us remember the overhead projector. I use an overhead to project the image on the wall. Follow these steps:

1. Find the font you want to use. You might have to install it on your computer

2. Type the saying in word

3. Select the words and change the font to outline

4. Make the font as large as possible-- so it will fit on a page

5. Print the image on a piece of transparency paper (be careful when taking it off as the ink will smudge)

6. Put the transparency on the overhead and line it up the way you want on the wall. At this point you can adjust the size and placement. This is what I like about it - choose the size and arrangement you want.

7. I trace the image on the wall in pencil - just in case the projector gets bumped

8. Fill in what you traced with the paint pen color of your choice. I haven't tried using white yet, so let me know if anyone tries it.

This is the saying I painted in our foyer:

This is the "welcome" I painted on our front door. There are many places online that sell this for about $15, but all mine took was a $3 paint pen (didn't even use it all) and about 30 minutes. My grandma visited a few weeks ago and she liked it so much that she went online to order one.
My mother-in-law had me paint her house numbers on her freshly painted black door. She bought the gold paint pen so it would match the kick plate and hardware on her door. It looks pretty cute!

Thursday, August 6, 2009

Rocking Chair for the Guest Bedroom - $13

Yet another thrift store find. Can you remember seeing this in your grandma's house... it smelled like it was there too! Nothing a little febreeze can't fix.
Anyway, I was looking for a small chair for the guest bedroom we just painted a dark gray. Kolin picked out the paint color in the clearance section of paint at Lowe's. Someone had returnd it because it wasn't the right color.
What do you think about the wall color? We painted it late last friday night and it almost looked like a chalkboard. Oh, and I made the curtains out of thrift store fabric (washed first). I didn't want to get our my sewing machine so I just used the iron hemming tape. I'll explain in another post.
Getting back to the chair I decided to paint it white and cover the cushion with yet another piece of fabric from the thrift store. This one was an interesting piece of light gray.
So I primed and spray painted the chair. Took off the cover and stapled new fabric to it. I think it turned out pretty good for a $13 rocking chair.
Well I can't just leave the extra fabric sitting their.... I have to make an accent pillow for the bed. So I got some ribbon and buttons and here it is...
I'm so excited to finish this room. We just visited a friend's house that has an old door as a headboard. I can't wait to start working on that project. Most of all I can't wait for visitors!!

Wednesday, August 5, 2009

$2 Bench... well okay $7

Another adjective for me is Thrifty. I have somehow convinced my husband to go to the thrift store on Saturday mornings to scope out deals. I think he does this for 2 reasons:
He gets a big breakfast on Saturday morning so he's up already
He's cheap like me: he would rather I spend $16 at the thrift store and keep me busy working on the project all day then let me go to the mall all day!
This is a picture of the $2 bench I found a few weeks ago. I of course painted it black, but I was also able to cover it with extra fabric I had from pillows I made a few years ago for the living room. I went to Walmart to find a cushion for it, but the foam cushion was $15, so I just went to the fabric section and bought quilt batting for $4 and folded it thick enough for the cushion.
I should also start buying spray paint in bulk - $.88/ can, but lately I've been going through 5 cans a week!
I think we can all love a $7 bench!

Wednesday Cookies - Peanut Butter Chocolate Chip

You will quickly learn that I love using cake mix to bake. Tonight after Kolin hinted that he would like some sweets (mind you he just had a piece of strawberry pie... I should share that recipe too - it's his mom's recipe) I decided to make the quick and easy option - turn to my cake mix cookbook!

Tonight I made the Peanut Butter-Kiss Cookies. I didn't have any kisses so I just mixed in Chocolate Chips. Yumm! We had some friends stop by and see the house - their daughter kept sneaking away to get more.

I would highly recommend getting this cookbook. It's a great gift for newlyweds or college kids. My mom got it for me in college and I'm still using it.

My boss even asked me about some cookie bars I brought into the office last week. That weekend she ordered the cookbook. I feel like I should be getting some sort of commission for pushing this book.

Even if you don't buy it I'm sure I'll post more recipes.

Saturday, August 1, 2009

Welcome to Ballyvaughn

I've always wanted a blog, but never thought I had much to say or share. I've been so busy lately and thought... now is the time to share in all the fun things I've been up to. The name of the blog comes from our new street- Ballyvaughn. We moved this summer!
Now it's my mission to transform my new house into a home. I hope you get some great ideas and share your ideas with me. You will notice very quickly that I am a bit... for a lack of a better word - cheap. I do what I can to find a clearance or see potential in a thrift store find. Oh and I also LOVE to cook and bake so I hope you can try some of the recipes I plan to post.